

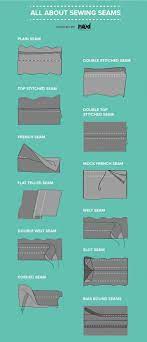
Sewing – what is it? and how it attaches to your garment
A seam is a term that refers to the seam (seam, if you need the technical term) that holds two pieces of fabric together. It is the cornerstone of a garment. The seam along the seam is called the seam line.
The seams ensure the structure of the garment and contribute to its construction.
They are also used as decorative elements.
Seam Allowance (SA) is the space between the edge of the fabric and the seam line. You can see the article on seam allowances for more details on how to sew straight lines and common seam allowances to use.
● How to choose the right stitch for your sewing.
● 1.
Lockstitch
● 2. Single-needle lockstitch
● 3. Double basting lockstitch
● 4. Bartack
● 5. Hairline
● 6.
Butted seams
(also known as stamped seams)
7. French seams
8. Flat-cut seams or top and bottom seams
9. Spot flat seams (also known as welt seams)
● 10. Rope joint or of pipe
● 11 .
Front seam
● 12. Fall seam of hem
● 13. Artificial seam (1)
● 14. Artificial seam (3)
● 15. Serrated seam
● 16.
Split Size 17.
Toe Size 18.
Bounate Size 19.
Sheet/Linen Size 20. Hand Sewn –
Leather Stitching 21.
Belt Seams
● 22. Sealed Seams
How to determine which seams are best for you.
A beautiful dress must be sewn with care. Not only that, but it should match the type of clothing you have, the material it’s made of, etc. Example: Flat seams are used to make the side seams of jeans.
There are a few things to consider when deciding which seams to use.
Substance type – “What substance is this?” is the primary consideration. If it is a transparent material, the seam treatment you choose will be very different from that of a thick damask material. Loosely woven cotton seams have a different finish than rayon blend fabric seams.
Lace fabrics have different seams than denim fabrics. Here is an article detailing all types of materials.
Seam Placement – Curved seams are treated differently than straight seams. If it’s an exposed seam, like a trouser, it’s different from a closed seam, like in the yoke or the collar. Sewing machine
– What can your sewing machine do?
What accessories do you have? , also important – if you have a sawtooth machine or at least a zigzag sewing machine, you have a lot more possibilities than just a straight line sewing machine.
Use and Use of Clothing—Children’s dresses require tighter seams than camisoles. A wedding dress has seams treated differently than a biker outfit.
related posts: How to sew a straight seam with simple tools.
Sewing Type
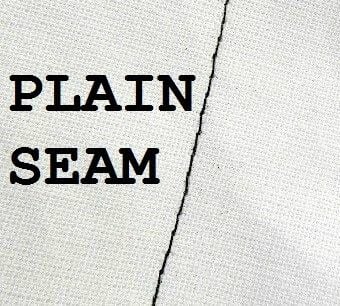
1. Lockstitch
In a lockstitch, two pieces of fabric are joined together with thread along the seam line. It is also known as the single-needle butterfly stitch because once it is sewn, the seam allowances on either side of the seam are pushed back to resemble a butterfly.

This is the simplest and easiest seam to make. It can be done by hand or by machine.
A straight stitch is used to make this type of seam, but a tight zigzag stitch can sometimes be used to make this type of seam, especially with knitted or stretch fabrics. Learn more about straight and zigzag stitches.
Exposed edges of this seam require seam treatment. The advantage of the
flat seam is that this seam does not add bulk to the seam line. But since it only has one seam, the seam strength is not very great.
Unlike the regular presser feet you use for sewing, you can use the 1/4″ presser foot for precise sewing with 1/4″ or 3/8″ seam allowances. It helps you to achieve a continuous line of stitching with the same seam allowance. See this article on using a 1/4″ sewing foot for details.
How to Sew a Lockstitch

Bring the right sides of two pieces of fabric together. Make sure the sutures are aligned.
Sew along the lines you made and mark the seam line.
Start sewing, then backstitch for added strength. Finally, do a reverse stitch, then do a forward stitch.
Don’t forget to open the seams (do not iron; just press with a hot iron)

For more on regular seams, click here to sew them strong and straight, not loose {& pretty seam curves} The best way to hand sew flat seams is to use a backstitch or saddle stitch. Saddleback stitches resemble machine lockstitch stitches.
You can check out these Saddle Stitch and Back Stitch articles for detailed steps on how to do it.
2. Single-needle lockstitch

Simple overlock, this stitch is both a strong stitch and a decorative stitch.
How to Sew Flat Seams in Simple Cross Stitch
To achieve this effect, push both seam allowances to one side and topstitch on that side.
3.

Double topstitch Flat seam
Double topstitch, it is a decorative seam which also gives great resistance to the seam line.
How to secure a flat seam with a double topstitch
To achieve this seam, after the flat seam is complete, press the seam allowance on both sides and topstitch equally on both sides of the seam.
4. Reinforced seams In many cases, you want the seams to be super strong – and there are plenty of ways to achieve those tear-resistant seams. Check out this article on sewing super strong seams here.
5. Hairline Seam

This is a closed seam, mainly used for collars and other closed areas. The seam hem is closed and cannot be seen from the outside.
How to sew a hair seam
Make a flat seam using very tight straight stitches that hold the straight sides of the fabric together. Cut very close to the suture line.
You can also cut the excess seam on the seam and crimp the seam. Make sure the sutures are not cut when cutting.
Turn right.
You can topstitch to secure the seam
6. Splice seam
(also known as stitched seam)
This is a very useful seam when sewing heavy materials such as suede, leather artificial, felt, etc.
How to Sew a Patched Seam
Decide which piece of fabric will have a patch application on top. Turn under the seam allowance of the patch along the seam line and press in place.
Place the folded fabric on top of another fabric along the seam line. The seam lines should line up. Snap together to hold it in place.
Sewn edge close to folded edge
print.
When sewing with heavy fabrics that do not fray at the edges, you can create this seam by trimming all of the seam allowance from the top piece. Now, since there is no more fabric to turn over, most of it is sold out.

7.French seam
This is the best seam for transparent fabrics.
Since this seam wraps the raw edge in a pleat, the raw edge is invisible from the outside without adding bulk. This seam is usually done on straight edges, but it can also be done on curved edges if you cut carefully.
How to Sew a French Seam
For this seam, unlike other seams, you must start on the wrong side of the fabric and match together at the seam line (not just together) to form an even seam. The
begins by marking the seam on the right side of the fabric with a 1/2″ seam allowance. Then draw a line down the middle of the original flap i on the wrong side.
e For a 1/2″ seam allowance, mark a seam
1/4″ across this 1/4″ line for a flat seam. (picture 1 above)
Slightly trim the seam allowance.
Now fold the right sides of the fabric together at the seam, covering the raw edges.The
is sewn over the original seam.
(at 1/2″ mark) right sides together on fabric (picture 2 above)
Flatten and iron to one side.
Raw edge is now securely closed in the back.
To make French seams And for a more detailed description of its use in garments, please refer to back French seam.
This gives sufficient strength to the seam line. This seam can be sewn both inside and outside the garment.
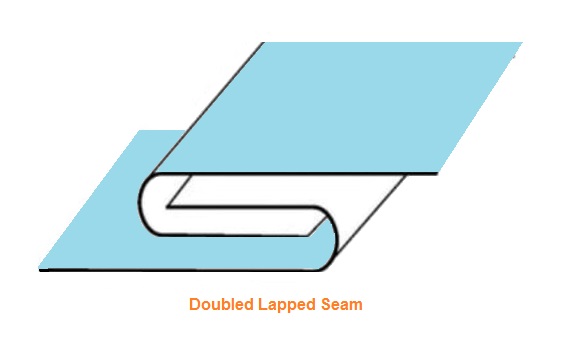
How to sew a flat seam?
Makes flat seams.


Iron the two seam allowances on one side.
A seam allowance is trimmed to 1/8”.
Flips the larger seam allowance over the smaller seam allowance, almost to the previously sewn seam line. Press it with an iron.
Now fold over the entire seam on the other side so that the original edge is hidden and ironed.
Hem seam.
Be sure to keep an even distance from the original seam line.
Learn more about flat seams here.
9. Simulated flat seam (also called welt seam)
This is a seam that looks a lot like a flat seam, but is easier to sew.
Unlike the flat seam here, it is unturned and unturned.
So this seam will have a raw seam on the wrong side. Therefore, it is better to use materials that do not fray or have invisible seams. This is an excellent seam for bulky materials like felt or synthetic leather.
How to sew a simulated flat seam.
Sew flat seam as usual, with straight sides sewn together.

Decide on which side to sew the seam allowance. Trim the seam allowance on this side to half its original size. Push the seam allowance on this side. (the larger seam allowance will now exceed the smaller seam allowance)
Now go to the right side of the fabric. Border close to the seam.
Then go to the other side and sew along the raw edge. There will now be two rows of stitches parallel to the seam line.
10. Cord or piping seam
In this seam, a fabric-covered cord is inserted between the seam lines. It is a decorative seam, mainly used in collars, cuffs, bags and interior decoration fabrics.
How to sew a cord or tube seam
This uses a cord covered with a stapler. You can buy prepackaged power cords or buy power cords and pack them yourself. It is sewn with a zipper at the foot. Secure the rope firmly in the side strips, then sew the side strips with the zipper foot and sew the rope inside. The suture should be placed as close to the cord as possible without the needle touching the cord.
See tutorial on how to make bias tape and how to tie fabric edges with
bias tape 11. Seams
Seams are typically used at armhole, neckline and waist seams. This creates a very nice finish at the
seam line How to Repair
Face Seams Make a finish for the

seam Sew it at the
seam line Trim the seam allowance to half its width.
Press the seam allowance to the side
Trim the seam allowance to the side close to the seam
This underseam prevents the seam from rolling up on the outside of the garment
Consult the tutorial for the best way to make a cover.
12.

Overcast Hanging Seam
How to Sew Overcast Hanging Seam
Makes a flat seam. One seam edge is cut halfway the other. The other seam is folded down and tied by hand.
13. Simulated French Seam (1)
This is a seam that can be used in place of a French seam where a French seam might not be possible, such as in curved seam lines, for ex.
Armholes of a transparent dress. This will also cut the seam lines cleanly.

How to sew ridiculous French seams.
Unlike French seams, here the straight sides are sewn together first for an even seam.
Places materials directly on top of each other.
Sew a flat seam along the seam.
Press the seam to open it and then close it.
Turns hem edge 1/4 inch for each seam. pressure.
Sew the edges along this folded edge so that the raw edge is closed on the inside.
14. Mock French Seam (3)

This is another copy of French Seam – looks similar but does it differently.
This seam can also be used instead of French seam and is ideal for sewing thin, delicate fabrics and loosely woven fabrics that tend to fray.
To secure this seam, sew a flat seam as usual. After that, halve one of the seam allowances.

Flip the other seam allowance over the finished seam allowance and stitch in place. Use a small zigzag stitch for this.
Your new seam will be just outside the seam line.

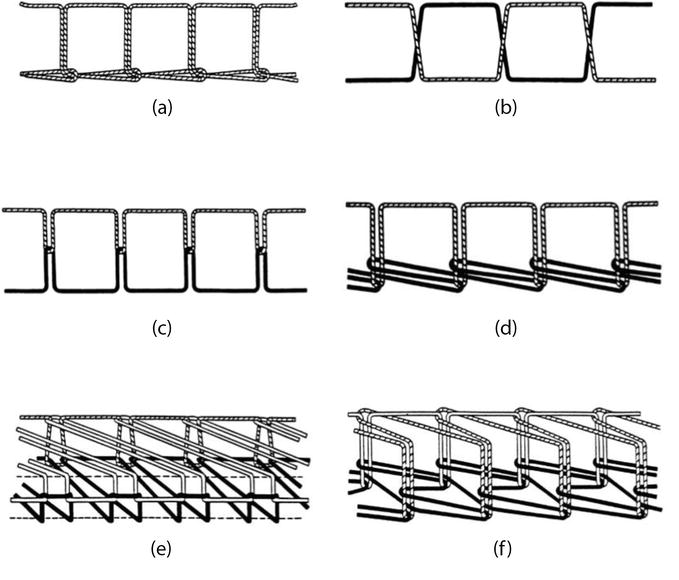
15. Zigzag seam
For this seam you will need a serger or serger.
In this seam, instead of regular straight stitches, zigzag stitches are used at the seam and the seam allowance is machine cut. This seam gives elasticity and flexibility to the seam.
This seam can be used with
1. It doesn’t matter if the seam stays flat or flares out.
2.
For loose garments
3. On lightweight fabrics
4. When sewing knits
How to sew a signature seam
Gather the right sides of the fabric and match the stitch lines.
Tighten the fabric under the needle The
hemming machine automatically trims the seam allowance and wraps the edge of the fabric with thread.
3-thread cut seams will give elasticity to the seams and 4-thread cut seams will give the seams strength.
3-thread cut seams are often used on knitted fabrics because of their stretch.
16.Lock Seam
This seam, which resembles a patch seam, is used for its functional and decorative properties.
How to sew a seam
Take a piece of fabric 1 1/2 inches wide, the length of the seam, under the seam. It is used as a backing between two fabrics which are patched along the seam.
17. Counterseam
is ideal for sewing heavy fabrics where both raw edges are bound with two seam allowances along the seam line
Quantity is bound to wrong side Print
Place wrong side of first piece of fabric along the edge on the right side of the second piece of fabric, keeping the seam allowance. Hold the
stitches in place along the folded edge.
18.
Butt seam
The edges of the fabric are folded over and joined with a zigzag stitch or a chain stitch. This is used when joining seams that do not require bulk. For example when sewing underwear. You can make this seam using a
19 sewing machine. Sheet Seam/
Linen Seam This is a seam where we use embroidery stitches to join the seams.
It’s very nice, but not as strong as the other seams. Stitches can be set horizontally or diagonally. Antwerp edge seams, herringbone seams, blanket seams or herringbone seams can all be used to join seams in this manner. These points are called insertion points.

How to sew this seam
1.
Finishing the edge of fabric
2. Tape the edges of both ends of fabric together with buttonhole stitch
3. Cut a strip 1 inch wide and the length of the edge of fabric
4. Drape the edge of fabric over the paper from the edge of the fabric, Make a distance between them of 1/2 inch
5. Sew the stitches between the edges of the fabric, weave, knot, turn all the work between the sides For more details see the post – Insert Stitch
6 .

20. Hand Stitching – Leather Stitching Leather stitching is an invisible stitching that can provide you with beautiful hand stitching. You can fold over the edges and sew along the folded edge as shown in the picture below. When you tighten the stitches, you get a neat seam. Learn more about this stitch in this article on slip stitch or leather stitch or this article on blind stitch

How to sew this seam
1.
Finishing the edge of fabric
2. Tape the edges of both ends of fabric together with buttonhole stitch
3. Cut a strip 1 inch wide and the length of the edge of fabric
4. Drape the edge of fabric over the paper from the edge of the fabric, Make a distance between them of 1/2 inch
5. Sew the stitches between the edges of the fabric, weave, knot, turn all the work between the sides For more details see the post – Insert Stitch
6 .
20. Hand Stitching – Leather Stitching Leather stitching is an invisible stitching that can provide you with beautiful hand stitching. You can fold over the edges and sew along the folded edge as shown in the picture below. When you tighten the stitches, you get a neat seam. Learn more about this stitch in this article on slip stitch or leather stitch or this article on blind stitch

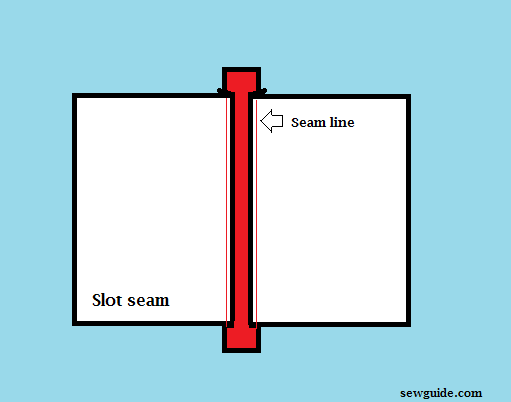
21.
Sealed seam In this seam, an additional strip of fabric is attached above the seam line. Prepare the fabric strips by pressing the long sides inward 1/4 inch, then holding the top of the seam to hide the seam line and pin along the edge.

22.
Taped Seams These are all taped and taped seams for water and weather protection. In this seam, a piece of fabric/tape is sewn over the seam to prevent water or any other element from seeping inside the item.
Tape can also be added to prevent warping.

Stitch Types – Best Stitches for Sewing
There are many stitch types that can be used for both hand and machine sewing. This handy guide with photos will help you determine exactly which stitches you need for your latest project. If you’re looking for the easiest sewing machine stitch, switch to straight stitch, and if you need easy hand stitching, the easiest is the stitch type


